come back often

Have you checked out all my blogs?


Dollhouse Minis: http://joannes18dolls.blogspot.com/


18” Dolls: http://joannes18dolls.blogspot.com/


General Crafts: http://joannes-place.blogspot.com/


Cooking: https://joanne-kitchen.blogspot.com/


Saturday, October 31, 2015

Fall Card for a Friend


This week I decided I wanted to make a card for a wonderful friend that has been going through some health problems and I decided to turn the camera on and let you all join me.


When I started I really wasn't sure where I was going with the card design. I knew that I wanted to use my maple leaf stamp with my Perfect Pearls on a dark color paper. I have used this technique in the past and I love how it looks when done. I wish the camera could do it justice because it just glows and I feel it is a must in the fall for a card. I picked out a sheet of dark brown card stock from a package I had picked up at JoAnn's a while back. Then I dug out my leaf stamp, this one is from a set from Hero Arts that I have had in my collection for a couple of years. I am not sure if this exact stamp is still available but I am sure you can find a leaf stamp that you love just as much.

So the first step was to cover the sheet of brown paper with some random maple leaves in the different colors of Perfect Pearls. The sets of Perfect Pearls come with everything you need to use them (4 containers of Perfect Pearls, 2 brushes and a small pad of Perfect Medium) Just use the Perfect Medium on your stamp like any ink and them brush/dab on the Perfect Pearls. Brush off any excess and repeat with as many colors and leaves as you want on your page.

When I was finished with my stamping and applying of the Perfect Pearls I simply misted the page with some plain water. This will help to set the Perfect Pearls so they don't rub off the paper. Allow the page to dry. I cut mine to size off camera.

Next I got out my new set of phrase stamps and used the one about friends. I stamped this on a 2” strip of a Vanilla card stock (same package as the brown) then added a gold embossing powder. Heat this with a heat gun to melt the embossing powder.


Now it was time to assemble. I used my tape runner to attach the leaf sheet to the card front. Then some foam tape to attach my sentiment band. I waited until I had the band adhered to the card to cut it to size so I could place the sentiment just where I wanted it.

Since this card has to travel all the way across the country I wanted to keep the card fairly simple (better chance of it arriving in good condition that way)


I hope you enjoyed the card I made and come back again next time. Thanks for watching my video and checking out my blog. 

Tuesday, October 27, 2015

Plan with Me- Halloween!!


Since this is the week of Halloween I am just kind of using a general Halloween theme for my plan with me. I had purchased a bunch of the Darice sticker books in different Halloween themes and hadn't really used them very much so I decided to depend on them for the décor this week. I have to say I am not really all that happy with the end result but maybe by the end of the week I will like it more.

Also since this is the last week for the October colors I wanted to use up the extra stickers I had made this month. I hated to see them just sitting there not being used. Mostly I had the full check boxes left and I like how that part came together. I debated a lot about whether I should make a couple of green ones to tie the green from some of the stickers in better but in the end I didn't. I still am not sure if it would have been better or not if I had.

I did make some full box decorative boxes since I had used up most of those and I like to use them. I got to use a few different designs that had come in my batch of digital paper I had purchased as well as I got to use some of my favorites again.

This is my 4th week using the dinner tracker in my planner and even though I never thought I would like it, I have to say I love it! I use it mainly as a record of what we had for dinner and I only list the main dish but I love to be able to look back and see when we ate different things. I have also found I am using up the leftovers a lot better because a quick glance at my planner reminds me of what we ate so I can remember if I have leftovers to eat at lunch time. It will also come in handy when my son starts in with his “you haven't made____ in a long time” I can now say when we did have that.

I am really enjoying the making of the stickers a lot for my planner. I am slowly finding myself understanding my Cricut a lot better. I am not to the point where I want to do any videos with it yet although, I am going to do some card making videos using items I have cut on it. I think the two main problems I am still having are my slow internet speeds where I live and for some reason the Cricut and my printer don't seem to communicate very well.

I think as far as making the stickers goes though I am developing my own style and I love putting together my weeks. It is just so much fun to do.

Now onto the deocor for this week. I am just not sure how I feel about it. I love looking at all the cute stickers in the Darice sticker books but I am just not sure how I like them in my planner. I did a week in August and I liked it a lot better. Maybe it is just I don't like the Halloween ones in my planner. One problem I ran into was finding stickers that would even fit. All the ones I really liked were way too big to go in the planner. Also the colored backgrounds were a problem for me. Especially since several of the ones I ended up using were on a turquoise background, they just don't fit in since that color is no where else. But, I just didn't see what I wanted on the other pages.

I am going to really concentrate on making the sticker books work next month. I have 4 of the Thanksgiving theme ones and I am going to use one book per week. This time I am going to be making the rest of the stickers to go with the backgrounds so I can see if it works better that way. Also I think the backgrounds in those books work better for the colors I am comfortable using.


Thank you for reading my rambling blog post today, I think I should have gotten more coffee this morning before I tried to write but I am trying to get everything uploaded. Hopefully, you made it through the post so you can look at these photos of my planner pages. 


Saturday, October 24, 2015

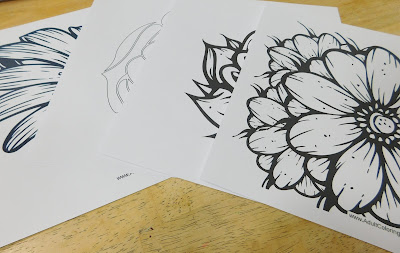
Adult Coloring Pages


I have seen so much about the adult coloring pages online the last couple of months and they sure look like a lot of fun. The biggest problem is that some of those coloring books are really expensive! And to add to the cost of the books themselves your either have to drive around looking for them or order them online and pay for shipping. Either way it counts up really quickly.

I know myself well enough to know that I might very well get bored this particular fascination fairly quickly so I knew I didn't want to throw a lot of money at it. At least not right off the bat. If I do try this and find that I do indeed love it I may then purchase some coloring books. But I do tend to get bored quickly and I am trying really hard to be careful about new hobbies.

I have for several years subscribed to the newsletter from Printable.net because I use so many of the free printables on that site. I also usually really enjoy Kevin's newsletter, he has a wonderful mix of personal stuff mixed with the announcements of what is going on with his site. It makes it all feel very comfortable and friendly. If you aren't familiar with his site here is the link tothe main site where you will find printables for just about anything you can think of. He has stuff for the home, for moms, for businesses, for teachers, for kids, the list is endless.

In his newsletter this week he mentioned his Printable adult coloring pages site. I took immediate notice of this and went right over to take a look. He has 15 coloring pages up at the moment and I downloaded all of them. I used the excuse that I wanted to show all of them to you on the video but let's get real. I want to color! I think the variety of designs is great, a bit of something for just about everyone. The best part is if we all start downloading his coloring pages Kevin will add more sooner! So here is the link, go over and download to your heart's content. Grab at least one to try out.

Like most of Kevin's printables these coloring pages come as a PDF so they are easy to print off as many times as you want.

I used some plain white inexpensive cardstock from the craft store to print mine on. I know that no matter what medium I decided to use to color with it will work on this paper just fine.


Now I have a couple of big decisions to make: which page do I color first???? And what do I use- I have my alcohol markers, waterbased makers and colored pencils..... hummmmm I need to get busy. 


Tuesday, October 20, 2015

Plan With Me- Haunted House (October 19-25, 2015)


This week I stepped way out of my comfort zone and totally changed the colors from what Erin Condren put in the planner. I was nervous but I really wanted to use the haunted house paper that I had found and I felt like the orange would really detract from it. In the end I am so glad I did what I did.


The paper that started this theme was the purple/pink and black haunted house design that ended up as two full boxes on the spread. I loved it at first sight. I had thought I was going to use it in the side bar and at the bottom of the pages but decided against that in fear it would be just to busy. Instead I used a spider design in those places and I love the way it turned out. Also this allowed me to justify using my favorite design twice in the full boxes.

To accent the theme I went with a color scheme of purples and grays/blacks and I think the combination is striking. I will have to use my white pen on some of the boxes if I use all the space but that is fine and I love the look.

The only sticker I am not totally happy with is the decorative haunted house I put on the side bar. I love the house it just doesn't go with the colors because of the blue and green but I loved the basic design so I just went with it. I l think it is going to be fine but I wish I could have found a similar haunted house with the correct colors.

The only purchased stickers I used was one leftover flag from one of the printable September kits that I had but I have no idea which one it came from since I purchased several and they are now all mixed together. More than one had similar flags.

The other purchased sticker was the printable planner sticker from FaryePlans on Etsy. These are such cute little planner stickers, I absolutely love them!


So that is it for this week I hope you enjoyed my plan with me and come back to see what I do next time. 


Saturday, October 17, 2015

October 2015 IPSY Bag


It's the middle of the month so that means another IPSY bag to open. I am really enjoying these a lot. I have to admit I wasn't so sure about them when I signed up but I am glad I did now.


This is bag number 3 for me and I am definitely starting to have some opinions on what I like to get and what really doesn't do it for me. I have liked most the of the bags so far although I must say this month is my least favorite and I will get into that in a bit. I have liked most of the makeup and the nail polish I got I have used several times now. As far as the skin items so far I haven't found any that I even like.

Now onto this month.

The theme seems to be “Alter Ego” which seems appropriate with Halloween coming at the end of this month.

The bag.... Well I really like the gold side, very pretty and it feels nice. As for the black side.... I really don't care for the shiny black material. I know it is going to show every finger print and bit of dust. Heck, it came out the envelope needing to be cleaned up. So I have a feeling that this bag will end up sitting and not getting used that much.


The first item I pulled out of the bag was an eye shadow brush from Royal & Langnickel with a retail value of $3.99. I am really excited about this because I know they make some excellent artist brushes so I am looking forward to see if this carries over to the make up brush too. I do love a good brush.


Next was a tub of MICA Beauty Cosmetics cream eye shadow in bronze. I was disappointed to find a crack on the top surface and it really feels like a thick skin has formed on the top of the product. When I did get down past this layer it is creamy and it is a pretty color. I don't use a lot of cream shadows but sometimes they are just the what is needed as a base under another product. I want to mention it was actually hard to wash off the swatch I had on my hand so I am hoping this means the product will wear all day when I do get around to using it.

Our next product was the Argan Face Serum from Nourish Organic retail price of the full size: $23.99. It is a really thin oily product and remained sticky on my hand until I washed it away. Not sure how that will translate to my face and I am not sure I really want to find out. I really don't like sticky face products.


The liquid lipstick from Meet Matt(e) Hughes is a gorgeous color!! I can't wait to try it out. I really hope it wears well because I love the color that much! (full size retails for $17)


The last item in the bag this month was a Scrub Me nice and gritty body scrub. I am excited about this one partly because of the fragrance. I can't put my finger exactly on what it reminds me off just that it for some reason makes me think of my grandma and grandpa's house from when I was really little.Full size of this product (8 oz) is $22.99)


So that was my bag for this month. Did you get an IPSY bag? What did you get? 

Tuesday, October 13, 2015

Plan with Me- Jack O'Lantern Theme (October 12-18)


This week I wanted to continue the celebration of October with a Jack O'Lantern theme in my planner. I love how this turned out. I was lucky to come across some digital paper that fit the theme perfectly and it is in colors I love too!


I am still fighting with my Cricut a bit but less than last week. I will come out on top in this battle. LOL

I was able to make some really cute stickers this week. I especially love how my hydrate stickers turned out.

I think with the exception of the stickers from a Darice sticker book or two I made all the stickers I used except the little planner one. That one came from FaryePlans on Etsy.


Thank you for checking out my blog and the video. Here are some pictures of the two pages in the spread. 


Wednesday, October 7, 2015

Plan with Me Pumpkin Patch


Since we are now officially into the month of October I decided to do Halloween type themes all this month. I am starting off with this Pumpkin Patch theme which I think it really cute. And really not overly Halloween for those of you that don't like the holiday.


I got my new Cricut Air about a week and a half before the filming of this plan with me and I am definitely s till in the learning process with it. I did manage to make most of my stickers this week though (and for the most part they were even the correct size!)

The only purchased stickers were some of the decorative stickers which I got at the local teacher store. They do have a wider white border than I would like but for the price they are fine.

The only sticker from an Etsy shop I used in the video was the planner sticker that I purchased as a printable sticker from FaryePlans.


Since I didn't remember to take the photos of the spread until Tuesday morning I had added a slow cooker sticker to Tuesday from The GiftedPepper on Etsy.